ctf平台搭建
目前最常见的平台是CTFd和GZCTF
CTFd
使用帆哥的一键部署脚本(centos7和ubuntu20上测试成功)
sh <(curl -s https://raw.githubusercontent.com/pwnthebox/ctfd-auto-deploy/master/install.sh)
2024.5.13
帆哥github被封了,重构/优化了一下自动部署脚本
https://github.com/dr0n1/CTFd_auto_deploy
GZCTF
适合办比赛(样式也好看),不适合自用和训练
新建两个文件 appsettings.json 和 docker-compose.yml
1
2
3
4
5
6
7
8
9
10
11
12
13
14
15
16
17
18
19
20
21
22
23
24
25
26
27
28
29
30
31
32
33
34
35
36
37
38
39
40
41
42
43
44
45
46
47
48
| {
"AllowedHosts": "*",
"ConnectionStrings": {
"Database": "Host=db:5432;Database=gzctf;Username=postgres;Password=<String1>"
},
"Logging": {
"LogLevel": {
"Default": "Information",
"Microsoft": "Warning",
"Microsoft.Hosting.Lifetime": "Information"
}
},
"EmailConfig": {
"SendMailAddress": "Admin@xxx.com",
"UserName": "ctf_noreply",
"Password": "******",
"Smtp": {
"Host": "smtp.163.com",
"Port": 465
}
},
"XorKey": "<String2>",
"ContainerProvider": {
"Type": "Docker",
"PublicEntry": "xx.xx.xx.xx",
"DockerConfig": {
"SwarmMode": false,
"Uri": ""
}
},
"RequestLogging": false,
"DisableRateLimit": false,
"RegistryConfig": {
"UserName": "",
"Password": "",
"ServerAddress": ""
},
"GoogleRecaptcha": {
"VerifyAPIAddress": "https://www.recaptcha.net/recaptcha/api/siteverify",
"Sitekey": "",
"Secretkey": "",
"RecaptchaThreshold": "0.5"
}
}
|
1
2
3
4
5
6
7
8
9
10
11
12
13
14
15
16
17
18
19
20
21
22
23
24
25
26
27
28
29
30
31
32
33
34
35
36
37
| version: '3.0'
services:
gzctf:
image: gztime/gzctf:latest
restart: always
environment:
- "GZCTF_ADMIN_PASSWORD=<String3>"
ports:
- "80:8080"
networks:
default:
volumes:
- "./data/files:/app/uploads"
- "./appsettings.json:/app/appsettings.json:ro"
- "./logs:/app/log"
- "./data/keys:/root/.aspnet/DataProtection-Keys"
- "/var/run/docker.sock:/var/run/docker.sock"
depends_on:
- db
db:
image: postgres:alpine
restart: always
environment:
- "POSTGRES_PASSWORD=<String1>"
networks:
default:
volumes:
- "./data/db:/var/lib/postgresql/data"
networks:
default:
driver: bridge
ipam:
config:
- subnet: 192.168.12.0/24
|
修改完配置文件后运行docker-compose up -d命令即可
注意密码的设置一定要符合复杂性要求,否则会报错
动态flag题目部署
模板项目地址:https://github.com/dr0n1/CTF_Docker_Template
包含pwn系列的ubuntu16,ubuntu18,ubuntu20,ubuntu22
web系列的php,java,python,go,mysql
misc,reverse系列的部分动态
因为不会crypto,就没写交互的crypto
pwn题部署
包含了ubuntu16,ubuntu18,ubuntu20,ubuntu22四个基础模板
假设现在出了一道pwn题,名字是baby_stack
首先根据题目选择需要的Ubuntu版本,这里以Ubuntu16为例,下载pwn_ubuntu16这个模板
把出好的二进制文件放到bin目录下,替换test
然后找到ctf.xinetd文件中的server_args值,修改test为附件名

第二步,构建镜像
在Dockerfile所在的目录运行docker build -t <镜像名> .
运行后可以用docker images查看下是否成功生成了镜像

第三步,本地测试或CTFd部署
本地测试这步可选,没有信心一次成功的话可以先在本地测试下
运行docker run -itd -p <对外暴露端口>:9999 <镜像名> /start.sh


nc连接后能返回程序的功能就ok了(别忘记删除容器)
接着在CTFd上部署,注意type选择direct,image与port对应即可

web题部署
php
包含了web_apache-mysql-php5.5,web_apache-mysql-php7.3,web_apache-php5.5,web_apache-php7.3 四个php模板。(如果需要其他版本的php环境,替换Dockerfile中的FROM命令即可)
1:将题目放入src目录下
2:将需要导入数据库的数据写入data目录下的data.sql
3:根据题目选择flag位置,然后修改start.sh
4:docker build
在sql环境中注意替换flag位置即可(要一一对应)

如果需要使用php扩展,则修改或增加Dockerfile文件中的docker-php-ext-install命令即可
1
2
3
|
sed -i 's/DocumentRoot \/var\/www\/html/DocumentRoot \/var\/www\/html\/public/' /etc/apache2/sites-available/000-default.conf
|
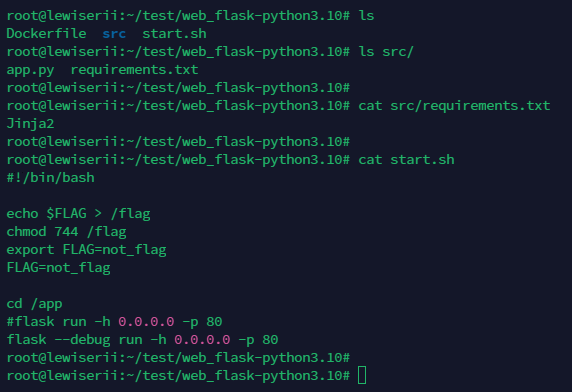
python
包含了web_flask-python2.7,web_flask-python3.10 两个python模板
1:src中存放题目代码,注意命名app.py。如果使用了除flask外的第三方库,请在requirements.txt中标明
2:默认启动时不启用debug模式,如需要启用debug模式请修改start.sh
misc题部署
包含了misc_python2.7,misc_python3.9两个镜像模板。利用http.server,SimpleHTTPServer和httpd启动一个web服务用来下载附件
个人认为动态misc的核心思路就是把出题过程转换为一个脚本,然后读取平台传递的flag后生成附件,利用web服务下载。所以部分工具题和复杂一点的题目是没有办法出动态的
还是先根据需求选择不同的环境,这里以misc_python3.9为例
第一步,先将出题思路写进一个脚本中,命名为challenges.py,所需的模块放到requirements.txt中
这个脚本有几点需要注意:
1:需要从/flag读取flag值
2:出题后生成的附件需要套一层压缩包以便访问自动下载,zip需要命名为attachment.zip
3:尽量在脚本结束时删除无用的文件
以下是一个简单的例子
1
2
3
4
5
6
7
8
9
10
11
12
13
14
15
16
17
18
19
20
| import random
import pyminizip
import os
from PIL import Image,ImageDraw,ImageOps
f=open('/flag')
flag=f.read()
a=Image.new("1",(300,20))
w,h=a.size
d=ImageDraw.Draw(a)
d.text((0,0),flag,fill=255)
a = ImageOps.invert(a)
a.save('1.png')
password = ''.join(random.choices('0123456789', k=8))
pyminizip.compress("1.png", None, "attachment.zip", password, 5)
os.remove("1.png")
|
第二步,将代码放进files目录,然后生成镜像

第三步,在CTFd上部署,然后验证
部署时端口选择80
开启靶机后访问,如果没出问题的话应该只会弹出一个保存文件的窗口,且能成功下载

下载到本地后就可以正常解题
docker in qemu in docker
常见于docker逃逸题目的部署
docker(deploy)-> qemu(flag)-> docker(attack)
如果用了kvm则要注意kvm的映射
1
2
| docker build -t docker-escaper .
docker run -itd -p 5555:5555 --device /dev/kvm -v /dev/kvm:/dev/kvm docker-escaper
|
没有kvm的解决方法
1
2
3
4
5
6
7
8
9
10
|
apt install cpu-check
kvm-ok
apt install qemu qemu-kvm libvirt-clients libvirt-daemon-system bridge-utils virt-manager libguestfs-tools
sudo systemctl enable --now libvirtd
sudo systemctl enable --now virtlogd
echo 1 | sudo tee /sys/module/kvm/parameters/ignore_msrs
sudo modprobe kvm
|
总结
一定要灵活使用dockerfile,不同题目根据需求做不同策略